A little paint goes a long way, huh?
Friday, November 26, 2010
Wednesday, November 17, 2010
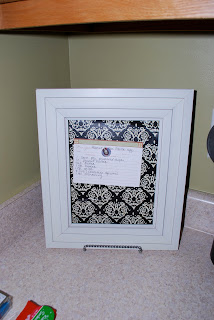
Magnetic Recipe Holder Tutorial
With Thanksgiving rapidly approaching, I thought there is no better time to share this project. It is so easy and cheap. I love the way it looks in my kitchen.
All you need is:
1. Frame
I got mine at Hobby Lobby while they were 50% off. Only $5
2. Glue gun and glue
3. Mod Podge
4. Paper
5. Sheet of metal
Go to Lowe's, some will even cut it for you!
Measure and cut your metal to the size of your frame
Mod Podge your favorite paper to the metal
Hot glue your metal to the back of the frame. Its best to put something heavy on it and let it sit for a few hours.
Tuesday, November 16, 2010
What is White and Gold and Red all over?
The title is so silly I know, but I love this project! Sitting in my parents basement was my old furniture from when I was a little girl. You know the furniture- White French provincial style with gold detail.
In search for a new entryway table I thought of this furniture.
May I first start my saying before you start a project like this, you have to go over to ALTAR'd, check out her awesome pieces and download her eBook. Best $10 I ever spent!
Here is my before:
After Sanding and removing of all things ugly,
It was time to start!
I have the best little helper!!!

Here is my finished product......
Isn't she just dreamy?!?!?!
Excuse my lack of decoration. This isn't the entryway she was made for, but I had to find her a new home.
A few tricks I learned from this piece:
1. The cheapest paint worked the best
Yes you heard read right. After several coats of an un-named paint, I went to good 'ol Olympic Flat paint. The best part $8 a gallon!
2. Use stain, Not glaze
I know that glaze is all the rage now, but for the life of me I can't get it down. Every time I have used it, it looks like my dogs have come running inside and shaking all over my finished piece after playing in mud all day. Instead, on this piece I used Minwax Ebony stain. Just use rags and get creative. You can't mess it up.
3. Have Fun
You read right! Just have fun. Who cares? Its paint. If you don't like it, start again.
4. Be Patient
Yes, it is easier said then done. At least for me, but you have to sand, prime, and let each coat of paint dry in between. Also make sure and wait until it is completely dry before distressing. I didn't. Ooops, the distress police are at my door!
Monday, November 15, 2010
Where do I begin?
The title says it all. Over the last few months I have been so busy with projects. Where are they?, you say. Well within the last few months my husband lost his job. No need to fret! He quickly found his dream job in our dream location! We are now officially locals to Charleston, SC. Of course with this came a lot of changes. Our house is still in NC. We tried to sell it but with an extremely lower price and no bites, we took it off the market. We'll try back in February. We did however buy ourselves a cute little condo. Much cheaper than the original plan of an apartment.


The condo is precious, a little smaller than our home in NC so we are having to be very creative.
With any new home comes renovation, right? Here are a few "before" pics!
Hubby is laying laminate wood floors, which I loooovvvveeee! And I decided to finally try what has been the talk of blog land. . . . board and batten. I have learned how to use a nail gun and a miter saw! I here the chant of "Go Caroline" as saw dust flies around!
Will show pics soon......
Subscribe to:
Comments (Atom)


