Monday, July 18, 2011

Missing my House- Tar Heel Tour

I had finally gotten my home the way I wanted it when we found out we were moving. I was so excited, yet bummed all at the same time. Between my husband and me we had some major project FAILS! It took several years, lots of $$$$, and sweat to figure things out.

Last weekend we finally got up to North Carolina to get the rest of our belongings. We are scheduled to close in August. I know we should be sad to see out first home together go, but we aren't! So many things have contributed to out bitterness. I don't miss NC, the neighborhood, or the house really... Just the space.

So, since I am missing my house tonight I thought I would share it with you

Entry Way

Family Room

View from kitchen

Kitchen

Master Bedroom

Master Bath

The Hubbys Favorite place

Stay tuned for The Beach Condo Tour!


Saturday, July 2, 2011

Happy 4th of July x2

Yesterday I showed you the bag I made for Lucy with a sneak peek at her shoes

I love making plain flip flops into something spectacular!

For this project you will need:
Flip flips
Ribbon
Needle and thread
button (optional)
hot glue

First  you will want to start with the flower yo yo

Take your fabric, and using a medium sized bowl or other circle template, trace a circle onto the wrong side of your fabric

Start by folding the fabric in about 1/4 inch and sew as close to the edge as possible


Once you have gone all along the perimeter, pull your thread tightly and it will begin to gather


Tie Tightly Put aside


Now its time to wrap the flip flops

I start with a drop of glue on the inside then begin wrapping the ribbon tightly and slowly while only adding glue to the inside


Once I finished wrapping all the way around, I put a drop of glue at the point of the shoe for the Fabric YoYo. To add a little funk I added buttons that I had around the house.

I loved how they turned out! Lucy does too!
I can't wait till Monday!!!

Friday, July 1, 2011

Happy 4th of July- And Tutorial

4th of July is my favorite day of the year! Parades, sunshine, cookouts, family, and fireworks!
I like to make Lucy her outfits for special days but this year snuck up on me. 

This was at her 4th of July Parade at School! I made the top the night before

Here she is waiting on the BIG parade. I made the dress and shoes too.


As you can see I love the 4th, this year is no exception. I have been obsessed with outfits for a month now. Lucy really really loved the tutu skirt from Gymboree, so she will be wearing that.
I have made shoes and a bag for the big parade


Today, I'm going to show you how I made the bag.
You will need:
Canvas
Red and Blue Fabric
Sewing machine and thread

The first thing I did was cut mu fabric into strips
3 of each at 3 inches wide

Iron and sew each of the strips


Once all that is completed, cut the canvas for you bag
I chose 10x12
You can find the tutorial here for how to make a bag
But before assembling, go ahead and make your ruffles
I chose for this project to do the long and loose stitch method
I took a strip and did one long straight loose stitch down the middle
Pull the bottom stitch to make a ruffle

Assemble your strips onto the canvas, then straight stitch them on

Once that is complete you can begin to assemble your bag.
Here is the tutorial for that.


I have the perfect model and she just flat out refused! So here I am. And NOOOOO my mirror is not that dirty!!!! I think.....

This bag is perefect to hold the candy that will get thrown out, if I wasn't leaving soon I'd make me one too!

What do you think?

Wednesday, May 18, 2011

Lucy's Dictionary

Horse- Hoo Hoo Hi
Pillow- Hep Poe
Water Tower- Wata Ball
Piggy Bank- Money Pig
Blankie- May-t May
Popsicle- Ice Pop
Marin- Emin


Enjoy!

Tuesday, May 17, 2011

I think it can I think it can....

If you have been following me you know that I usually don't share giveaways very often. I usually never enter them because quite frankly, I'm not going to win.
But when it comes to the AMAZING Silhouette machine, I'm all over it like white on rice.
I want this baby so bad, I can even tell you. I have so many ideas that I want to get out, but can't- Not until I get this bad boy. At Christmas they were running a special for $175. I WISH I had bought it then :o(. Right now the big purchase just isn't in the cards, so I am badly trying to win one!

You can try too, just go over to Tatertots and Jello and check it out!


Saturday, May 14, 2011

Beach Bag Tutorial

My friend Carrie spent Mothers Day at the Beach this year and fell in love with a beach bag she saw. The bag was made out of a beach towel! She couldn't resist trying to make one. So a few days ago she came with towels in hand.  Since we had no pattern to go by we made 2, the first one was ok. The second one turned out really cute! Silly me took NO pictures! I am officially the worst blogger EVER!
So since I have no pictures, and I also bought a cute little towel, I decided to make one for my cousin who will be here tomorrow.

Good thing I embroidered her name on it because I might have to keep it!

Items Needed:
Towel of choice
wash cloth
Webbing


1. Fold the towel in half, and cut the sides and top to the size you want. I used a bag that I had as a pattern
2. Fold the tops and hem
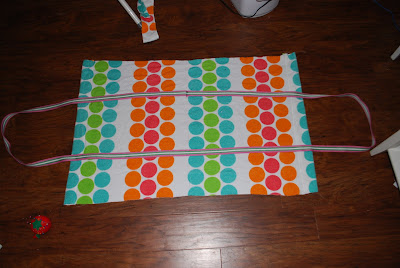
3. Once you have hemmed the top of the bag, take your webbing and lay it out on your bag to position how much you need
Then sew the 2 ends together
Then re-position with the sewn part of the webbing in the middle so that it will be at the bottom of the bag. Sew the webbing to the bag. I used 2 straight stitches on each side. If you want to cut time you can do one straight stitch down the middle
Now its time to work on the pocket. Pull out your wash cloth, fold in half and sew at the top wrong side out like a pillow. Turn right side out position to where you want it. With a zig zag stitch sew the bottom and sides
Once you have done that, fold your bag together wrong side out, and sew the sides
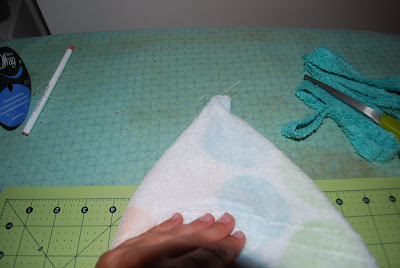
Take the bottom corners and make a triangle
The bottom is flat facing up
Sew a straight stitch for the bottom of triangle
Turn your bag right side out and you should have a beautiful bag!

I'll be linking to the parties on the right side of the page!

Visit thecsiproject.com

Sunday, May 8, 2011

Bucket List?

Little Miss Momma posted her list the other day. It made me realize I too have a list, I just don't think I have ever written them down. I've been thinking a lot about this. Yes.... about the list. If I write it down on this blog, then it is real- out there- and must be achieved. You will see some things scratched off the list because duh! I have done something!


1. Get Married
2. Have children
3. Travel to Europe
4. Jump out of plane
5. Become involved in the community
6. Join a church
7. Meet a celebrity
8. Put my feet in the Pacific Ocean
9. Win a big lottery
10. Write a book
11. Live at the Beach
12. See the United States
13. Grow Hydrangeas
14. Be skinny
15. Meet George W
16. Have my own business
17. Sing
18. Be best friends with my daughter
19. Be part of something good
20. Own a Louis Vuitton Bag
21. Sew- like really sew- like really good
22. Do a back hand spring
23. Go to A Boston Red Sox Game
24. Go to Disney World
25. Visit Hawaii
26. Be on the Today Show
27. Visit NYC
28. Be a part of the Lucille Ball Festival in Jamestown ny
29. Meet a member of Lucy or Desi's Family
30. Go before my Children
31. Rest in Heaven

My list is open- ended which means I will always add to it! Life changes, we make plans and God laughs! Now go make your list! Even if you don't scratch one thing off, live life to the fullest!


Wednesday, May 4, 2011

Sew Sweet Patterns and Pinafore Bloomer Set made for Lucy!

I've been doing a lot of sewing lately ever since I used my first pattern from Sew Sweet Patterns
I've never been able to follow the typical patterns found at sewing shops
The paper is too thin for me to see and follow, so everything I have ever made has been me just winging it!

Enter Sew Sweet Patterns! This Mother Daughter Duo is wonderful! The patterns and instruction are so easy to follow. I am a self taught sewer and my first pinafore turned out better than I ever imagined!

This wonderful company now has their own blog, and as part of their 1 year celebration they are giving away an awesome prize pack! Click here, buy some patterns and follow their blog! 

Here is the picture of Lucy wearing her Reversible Pinafore Bloomer Set I made using the pattern purchased from Sew Sweet Patterns. I think it turned out perfect for Easter. On the other side I embroidered  a red crab with her name. I haven't been able to get a picture of the crab yet.


Saturday, March 12, 2011

Creative rut

When I found out that we were moving to Charleston I was overwhelmed with excitement
When we bought our condo I was even more excited
6 months later I'm not wanting to create, design, decorate, craft, sew, or bake anything
This little condo is no longer a fun project, but a chore
The pipes are busted, the carpets were smelly, the walls nasty, electrical bad, and the bugs...
oh the bugs!

It wouldn't be so bad all in all if were weren't paying 2 mortgages
2 mortgages are fine as long as you are in the better home
In this case we are not, just a better location....the beach

But still, with all the trials we have faced with trying to sell our home in NC, I have found myself in a creative rut.
I hope to be out of it soon, and by that I mean I hope our house sells soon so we can get into our permanent home

Have you ever found yourself stuck in a rut?

Sunday, February 27, 2011

A Winner!....A little late

Its been a little crazy around here this week/weekend
My trip back to North Carolina was a little longer than anticipated which means a lot had to be done this weekend. But who cares about that stuff right!?!?!?! Lucy and her trusty bucket picked the winner.
The winner of the bag is.......

Court!

Court said:
"I'm a new follower"

Send me your address and I'll get that to you this week!

Friday, February 18, 2011

Dance bag Tutorial and GIVEAWAY!-CLOSED

 When Lucy started dance again back in the fall,
she needed new tap shoes, ballet shoes, tutus, tights, and of course leotards!
I couldn't believe that in one summer she outgrew everything!
With all this fancy schmancy dance attire, she had to have  could use a new bag, right?
I must warn you, if you were looking for a difficult dance bag tutorial, 
you are in the wrong place
I made 2 of these, 1 for Lucy, and of course one for Marin.
These girls get crazy compliments on these bags and have even sold a few
Supplies needed:
White tote bags (You can find a 3 pack at Hobby Lobby for $6.99)
Tulle of any color
Coordinating Ribbon
Hot Glue (and Gun :o))
I have an embroidery machine so I decided to embroider Lucy's name
If you decide to do the same, or have someone do it for you, Make sure this is your first step
You don't want the tulle to get tangled or malled
Step 1
Lay out your bag of choice and the tulle
Tulle is extremely difficult to work with 
I find that when it comes to tulle be as simple as possible
I folded over the tulle several times to make it fuller and the right size
Pin the tulle to the bag starting in the middle
I wanted a cleaner look for this bag so I pinned the tulle straight
If you want a "rufflier" bag, pleat every 2 inches
Is rufflier a word? It should be!
sew with a straight stitch
Don't worry about making it perfect, you'll cover with the ribbon 
It should look like this
Now that you have the tulle sewn, pull out your ribbon
You can sew this on or use your Hot Glue
I prefer to sew since it is being carried by kids

Sew a straight stitch on top, and on the bottom
Set the bag to the side
Take your ribbon and make a bow
You can find that tutorial here
Glue your bow to the center of the ribbon
Since I take the easy way out when working with tulle and fold it to make it fuller,
you will want to cut it to make it fluffy
You can see in the picture below where to cut


 Here you go! I love the leopard with the pink
This is fun for holidays too. 
Now for the GIVEAWAY!
Yay! My first one!
This bag can be yours!


Here are the rules:
1. Become a follower and leave a comment saying you are
(leave a comment if you always have been)
2.Blog about the giveaway and leave a comment letting me know


Visit thecsiproject.com

Friday, February 11, 2011

Day 5! Laughing Cow Queso

Welcome to Day 5 in the Faux Health, Faux Sure Series. I've definitely saved the best for last with this one. In fact, this post is a little late because I had to make a second batch for the family.

Ingredients Needed:
1 pack (8 wedges) Laughing Cow Swiss Cheese Light
1/4 C. Salsa of your choice
Splash of Milk or Water


Mix all your ingredients into a microwave safe bowl, and microwave for 45 second intervals, taking out to mix each time. For a lower calorie version you can use water. If you aren't to concerned than milk will give it a richer taste. Either one keeps it creamy.

Since I'm the one trying to watch the calories I love to eat mine with Pretzel chips.
Little Lu, and hubby prefer tortilla chips.

Okay, so here we go with the good stuff! Because the nature of the dish I'm breaking the down the stats for the overall dish not serving. You will have to add calories and fat for what you decide to eat the dip on.As a reminder, I am in no way a nutritionist. I read labels and try to consume healthy alternatives to dishes I love.

{Calories 310}
{Fat 12}
{Carbs 10}


Can't wait to show you all what I have in the works for next week. There will be a giveaway!